项目资安学工项目
FANSEA资安学工考勤系统
当前技术需要
- Git的深入理解
- 表文档导出技术
- swagger使用
- 熟悉若依框架
数据库表设计
数据库名称:
表一:用户表
| 字段 |
含义 |
数据类型 |
默认值 |
是否可空 |
约束 |
| th_id |
学号 |
bigint(20) |
|
否 |
主键 |
| tb_name |
姓名 |
varchar() |
|
否 |
|
| tb_major |
班级 |
varchar() |
|
否 |
|
表二:考勤人表
| 字段 |
含义 |
数据类型 |
默认值 |
是否可空 |
约束 |
| tb_id |
工号/学号 |
bigint(20) |
|
否 |
主键 |
| tb_name |
姓名 |
varchar() |
|
否 |
|
| tb_sex |
性别 |
tinyint |
|
否 |
|
| tb_identity |
身份(字典) |
tinyint |
|
否 |
外键 |
表三:检查表
| 字段 |
含义 |
数据类型 |
默认值 |
是否可空 |
约束 |
备注 |
| tb_id |
ID |
bigint |
|
|
主键 |
|
| tb_check_time |
检查时间 |
timestamp |
|
|
|
默认系统时间年月日,也可以自己选择 |
| tb_check_section |
检查节次 |
tinyint |
|
|
|
节次是固定的,用0-12来决定,0为早间12为其他 |
| tb_check_location |
检查地点(教室/宿舍) |
|
|
是 |
|
|
|
|
|
|
|
|
|
|
|
|
|
|
|
|
| tb_types |
检查类型 |
tinyint |
|
|
|
|
| tb_laws |
有无违纪 |
tinyint |
|
|
|
|
| tb_submission_time |
提交时间 |
timestamp |
|
|
|
|
| tb_remarks |
备注 |
varchar(255) |
NULL |
是 |
|
|
表四:身份表
| 字段 |
含义 |
数据类型 |
默认值 |
是否可空 |
约束 |
| tb_identityId |
身份id |
tinyint |
|
否 |
主键 |
| tb_identity_name |
身份名称 |
varchar |
|
否 |
|
问题描述
- 检查时间默认系统时间,也可以选择日期

- 用户表和考勤人员表合成一张表(0代表是学生)
因为学生可以是普通用户也可以是考勤人员,要是
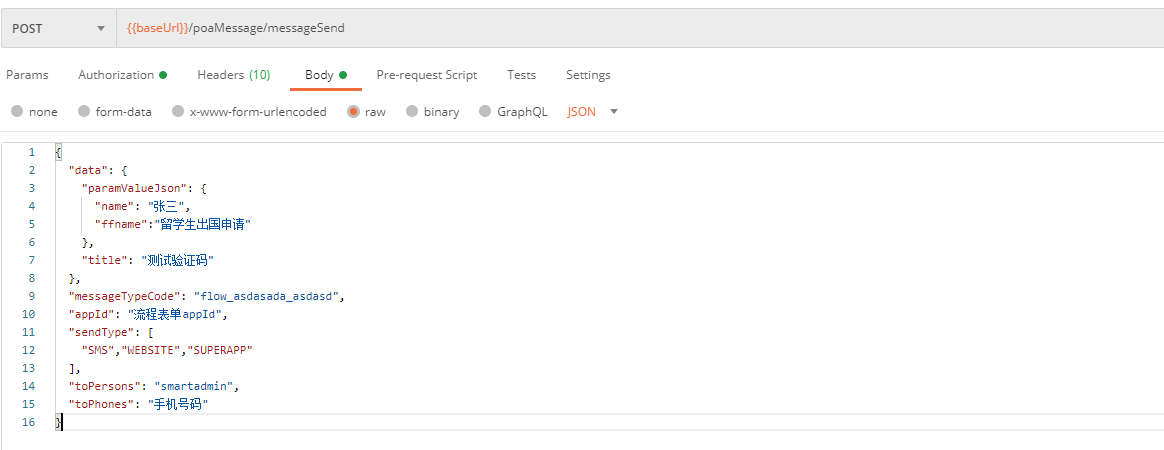
应用消息推送
请求内容展示:
请求方式:POST(HTTPS)
请求地址: https://qyapi.weixin.qq.com/cgi-bin/message/send?access_token=ACCESS_TOKEN
请求体:
1
2
3
4
5
6
7
8
9
10
11
12
13
14
| {
"touser" : "1010001",
"msgtype" : "textcard",
"agentid" : 2,
"textcard" : {
"title" : "违纪提示",
"description" : "<div class=\"gray\">2016年9月26日</div> <div class=\"normal\">恭喜你抽中iPhone 7一台,领奖码:xxxx</div><div class=\"highlight\">请于2016年10月10日前联系行政同事领取</div>",
"url" : "URL",
"btntxt":"详情"
},
"enable_id_trans": 0,
"enable_duplicate_check": 1,
"duplicate_check_interval": 1800
}
|
RESTFul风格获取请求头方法
1
2
3
4
5
6
7
8
| @GetMapping("/getParameter")
String getString(HttpServletRequest request) {
String name=request.getParameter("appId");
Map map=request.getParameterMap();
return name;
}
|
LocalDate日期格式化
查阅文档:LocalDate格式化
查阅文档:Hutool包发送Http请求
1
2
3
4
5
| HashMap<String, Object> paramMap = new HashMap<>();
paramMap.put("city", "北京");
String result= HttpUtil.post("https://www.baidu.com", paramMap);
Copy to clipboardErrorCopied
|
消息推送
*消息,事务对接前置条件*
1.注册POA:厂商提供应用系统,应用描述,所属系统,申请原因给校方。
2.校方注册POA完成以后,提供clientId,clientSecret,scope。
3.校方后台注册应用系统,提供appid。
4.厂商使用之前获得的ClientId、ClientSecret,Scope去换取Access Token。
5.厂商使用Access Token,appid调用具体接口。
具体参考概述,准备对接:
https://mtdocs.dev2.supwisdom.com/ttcDocs/api/newttc/summary.html
- 获取access_token
- 根据接口封装推送api
1
2
3
4
5
6
7
8
9
10
11
12
13
14
15
| requestJsonMap.put("sendType", new String[]{"SUPERAPP"});
String jsonStr = JSONUtil.toJsonStr(requestJsonMap);
log.info("请求参数:{}", jsonStr);
String string = HttpRequest.post(requestUrl)
.header("Authorization", "Bearer " + access_token)
.header("Content-Type","application/json")
.body(jsonStr).execute().body();
if (JSONUtil.parseObj(string).getInt("code") != 0) {
log.error("推送消息失败,错误码:{},错误信息:{}", JSONUtil.parseObj(string).getInt("code"), JSONUtil.parseObj(string).getStr("msg"));
throw new BusinessException(ErrorCodeEnum.INTERNAL_SERVER_ERROR, "推送消息失败");
}
|
统一异常处理
使用@ControllerAdvice和@ExceptionHandler(value = BusinessException.class) @ResponseBody
1
2
3
4
5
6
7
8
9
10
11
12
13
14
15
16
17
18
19
20
21
22
23
24
25
26
27
28
29
30
31
32
33
34
35
36
37
38
39
40
41
42
43
44
|
@ControllerAdvice
@Slf4j
public class GlobalExceptionHandler {
@ExceptionHandler(value = BusinessException.class)
@ResponseBody
public Result<?> businessExceptionHandler(BusinessException e) {
return ResultUtils.error(e);
}
@ExceptionHandler(value = RuntimeException.class)
@ResponseBody
public Result<?> runtimeExceptionHandler(RuntimeException e) {
return ResultUtils.error(
ErrorCodeEnum.INTERNAL_SERVER_ERROR.getCode(),
e.getMessage(),
"服务器发生错误, 请及时告知开发人员"
);
}
@ExceptionHandler(value = {MethodArgumentNotValidException.class, HttpMessageNotReadableException.class, ConstraintViolationException.class})
@ResponseBody
public Result<?> ArgumentValidExceptionHandler(Exception ignored) {
return ResultUtils.error(
ErrorCodeEnum.BAD_REQUEST,
"请检查参数是否正确"
);
}
@ExceptionHandler(value = {MissingServletRequestParameterException.class})
@ResponseBody
public Result<?> MissingServletParameterExceptionHandler(Exception e) {
return ResultUtils.error(
ErrorCodeEnum.BAD_REQUEST,
"请核对参数,以免重新登录"
);
}
}
|
SpringSecurity
登录的最终目的就是生成Token和在Redis保存会话信息
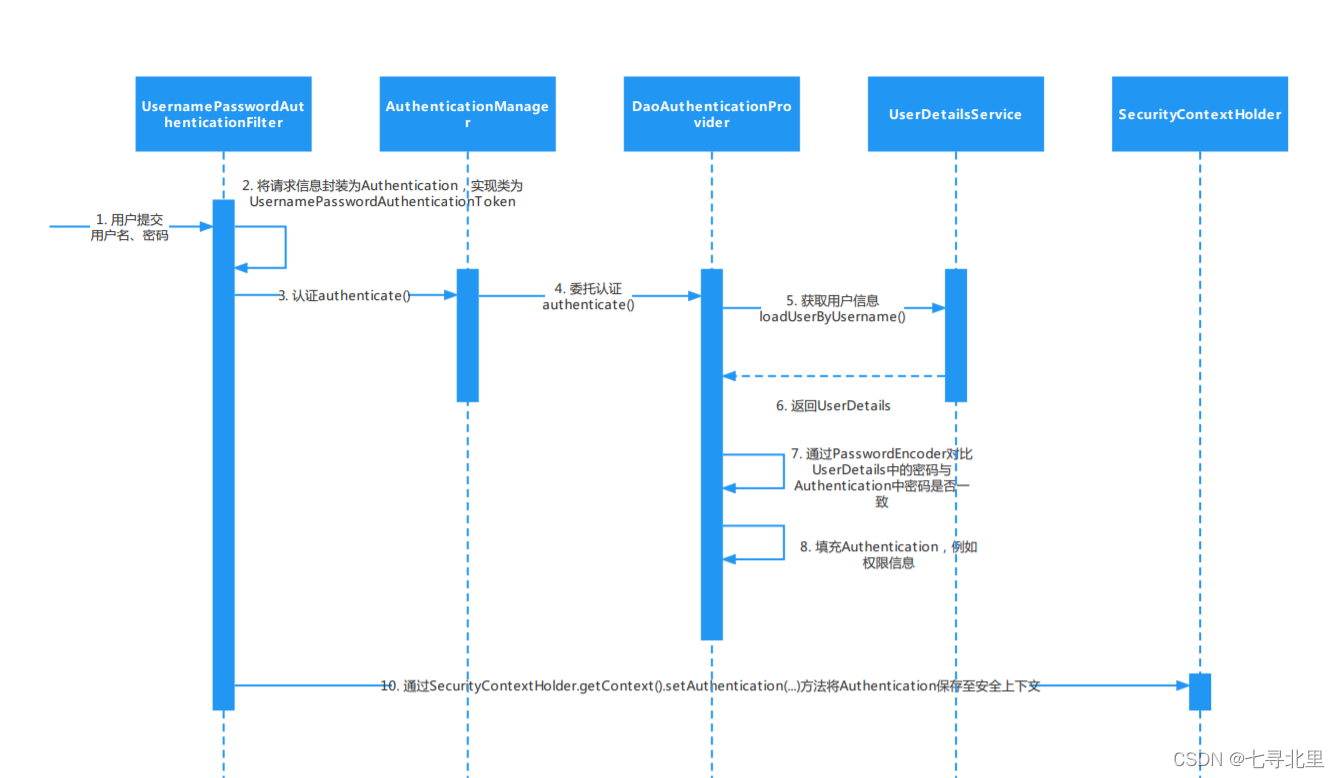
SpringSecurity登录流程
在账号密码的登录情况下,需要调用将用户信息封装成 UsernamePasswordAuthenticationToken 对象调用 authenticate 验证
1
2
3
4
5
6
7
| public ResponseResult login(User user) {
UsernamePasswordAuthenticationToken authenticationToken=
new UsernamePasswordAuthenticationToken(user.getUserName(),user.getPassword());
Authentication authenticate = authenticationManager.authenticate(authenticationToken);
}
|
1
2
3
4
5
6
7
8
9
10
11
12
13
14
15
16
17
18
|
@Service
public class UserDetailsServiceImpl implements UserDetailsService {
@Autowired
private UserDao userDao;
@Override
public UserDetails loadUserByUsername(String username) throws UsernameNotFoundException {
LambdaQueryWrapper<User> queryWrapper=new LambdaQueryWrapper();
queryWrapper.eq(User::getUserName,username);
User user = userDao.selectOne(queryWrapper);
if (Objects.isNull(user)){
throw new RuntimeException("用户不存在!");
}
return new LoginUser(user);
}
}
|
- 用户登录,生成token返回给前端,并将token和用户信息键值对保存在Redis
- 在登录中重写
loadUserByUsernameSpringSecurity会自动根据用户信息封装的authenticationToken和loadUserByUsername在数据库查到的数据用校验authenticate
- 用户访问需要校验的接口,首先进入
OncePerRequestFilter过滤器链
- 做token续期
- 全局user用户信息保存(保存在
SecurityContextHolder)
1
2
3
4
5
6
7
8
9
10
11
12
13
14
15
16
17
18
19
20
21
22
23
24
25
26
| @Component
@Slf4j
public class TokenAuthenticationFilter extends OncePerRequestFilter {
@Resource
private UserDetailsServiceImpl userDetailsService;
@Resource
private TokenService tokenService;
@Override
protected void doFilterInternal(HttpServletRequest request, HttpServletResponse response, FilterChain filterChain) throws ServletException, IOException {
LoginUser loginUser = tokenService.getLoginUser(request);
if (loginUser != null) {
log.info("登录用户: {}", loginUser);
List<GrantedAuthority> authorities = userDetailsService.getRoleList(loginUser.getUserRoleId());
UsernamePasswordAuthenticationToken authenticationToken = new UsernamePasswordAuthenticationToken(loginUser, null, authorities);
SecurityUtils.setAuthentication(authenticationToken);
tokenService.refreshToken(loginUser);
}
filterChain.doFilter(request, response);
}
}
|
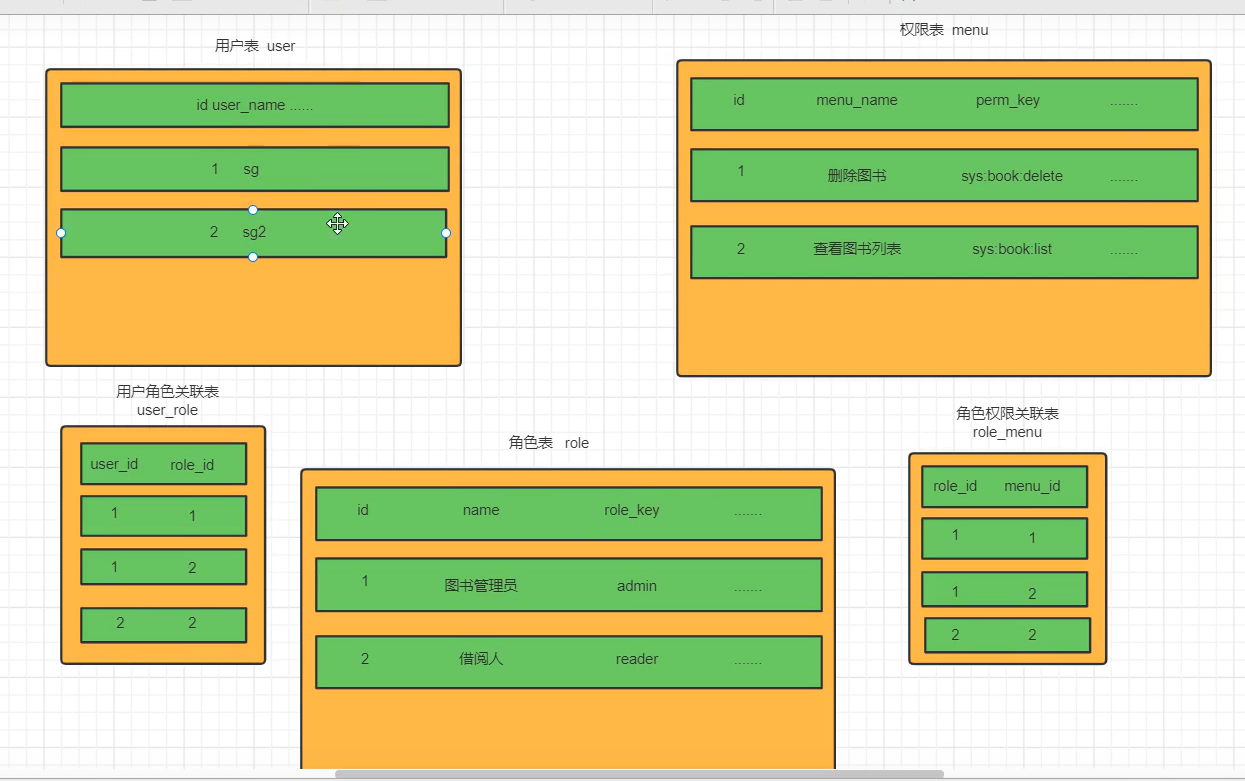
RBAC模型
设置用户表,权限表,角色表,
角色表是多权限的集成,可以用来降低冗余
用户可以对应多角色
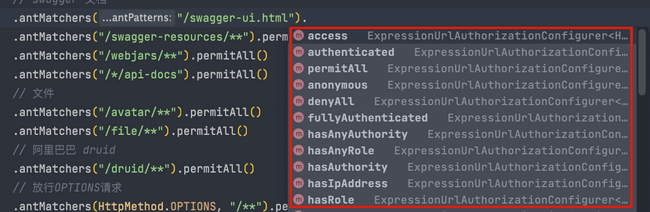
权限校验
有哪些控制请求访问权限的方法?
permitAll():无条件允许任何形式访问,不管你登录还是没有登录。anonymous():允许匿名访问,也就是没有登录才可以访问。denyAll():无条件决绝任何形式的访问。authenticated():只允许已认证的用户访问。fullyAuthenticated():只允许已经登录或者通过 remember-me 登录的用户访问。hasRole(String) : 只允许指定的角色访问。hasAnyRole(String) : 指定一个或者多个角色,满足其一的用户即可访问。hasAuthority(String):只允许具有指定权限的用户访问hasAnyAuthority(String):指定一个或者多个权限,满足其一的用户即可访问。hasIpAddress(String) : 只允许指定 ip 的用户访问。
- 登录校验身份,并附上角色
1
2
3
4
5
6
7
8
| Integer role = StrUtil.isNotBlank(userId) ? RoleConstants.CHECKER : RoleConstants.OTHER;
LoginUser loginUser = new LoginUser(
userId,
null,
role,
null,
userDetailsService.getRoleList(role)
);
|
1
2
3
4
5
6
| public List<GrantedAuthority> getRoleList(int roleId) {
Map<Integer, String> roleMap = RoleConstants.roleMap;
ArrayList<GrantedAuthority> authorities = new ArrayList<>();
authorities.add(new SimpleGrantedAuthority(roleMap.get(roleId)));
return authorities;
}
|
1
2
3
4
5
6
7
8
9
10
11
12
13
14
15
16
17
18
19
20
21
22
23
| public interface RoleConstants {
Integer ADMIN = 0;
Integer CHECKER = 1;
Integer OTHER = 2;
Map<Integer, String> roleMap = new HashMap<>() {
{
put(ADMIN, "ROLE_ADMIN");
put(CHECKER, "ROLE_CHECKER");
put(OTHER, "ROLE_OTHER");
}
};
}
|
- 在SecurityConfig中配置权限路由
1
2
3
4
5
6
7
8
9
10
11
12
13
14
15
16
17
18
19
20
21
22
23
| @Bean
public SecurityFilterChain securityFilterChain(HttpSecurity httpSecurity) throws Exception {
httpSecurity.csrf(AbstractHttpConfigurer::disable)
.cors(CorsConfigurer::disable)
.sessionManagement(
sessionManagement -> sessionManagement.sessionCreationPolicy(SessionCreationPolicy.STATELESS)
);
httpSecurity.authorizeHttpRequests(authorizeRequests -> authorizeRequests
.requestMatchers("/user/login/token","/user/login/mock", "/user/login/wechat/", "/admin/login", "/admin/register","/violationDetail","/user/check/violate/*","/user/check/isConfirm/*").permitAll()
.requestMatchers(HttpMethod.OPTIONS).permitAll()
.requestMatchers("/admin/**").hasRole("ADMIN")
.requestMatchers("/user/**").hasRole("CHECKER")
.anyRequest().authenticated()
);
httpSecurity.exceptionHandling(exceptionHandling -> exceptionHandling
.authenticationEntryPoint(unAuthorizedRequestHandler)
.accessDeniedHandler(accessDeniedHandler)
);
httpSecurity.addFilterBefore(corsFilter, LogoutFilter.class);
httpSecurity.addFilterBefore(tokenAuthenticationFilter, UsernamePasswordAuthenticationFilter.class);
return httpSecurity.build();
}
|
校验登录状态
1
2
3
4
5
6
7
8
9
10
11
12
13
14
15
16
17
18
19
20
21
22
23
24
25
26
27
| @Component
@Slf4j
public class TokenAuthenticationFilter extends OncePerRequestFilter {
@Resource
private UserDetailsServiceImpl userDetailsService;
@Resource
private TokenService tokenService;
@Override
protected void doFilterInternal(HttpServletRequest request, HttpServletResponse response, FilterChain filterChain) throws ServletException, IOException {
LoginUser loginUser = tokenService.getLoginUser(request);
if (loginUser != null) {
log.info("登录用户: {}", loginUser);
List<GrantedAuthority> authorities = userDetailsService.getRoleList(loginUser.getUserRoleId());
UsernamePasswordAuthenticationToken authenticationToken = new UsernamePasswordAuthenticationToken(loginUser, null, authorities);
SecurityUtils.setAuthentication(authenticationToken);
tokenService.refreshToken(loginUser);
}
filterChain.doFilter(request, response);
}
}
|
身份校验失败
这段代码实现了AuthenticationEntryPoint接口的commence方法。这个方法在处理登录授权失败时被调用,它将会返回一个包含错误代码、消息和描述的JSON格式的响应。
1
2
3
4
5
6
7
8
9
10
11
12
13
14
15
16
17
18
19
20
21
22
| @Component
public class UnAuthorizedRequestHandler implements AuthenticationEntryPoint {
@Override
public void commence(HttpServletRequest request, HttpServletResponse response, AuthenticationException authException) {
response.setStatus(ErrorCodeEnum.OK.getCode());
response.setContentType("application/json; charset=utf-8");
response.setCharacterEncoding("UTF-8");
Map<String, Object> responseData = new HashMap<>();
responseData.put("code", ErrorCodeEnum.UNAUTHORIZED.getCode());
responseData.put("message", authException.getMessage());
responseData.put("description", "身份信息验证失败, 请重新登录");
responseData.put("data", null);
try {
PrintWriter writer = response.getWriter();
writer.append(JSONUtil.toJsonStr(responseData, JSONConfig.create().setIgnoreNullValue(false)));
writer.flush();
} catch (IOException e) {
response.setStatus(ErrorCodeEnum.INTERNAL_SERVER_ERROR.getCode());
}
}
}
|
跨域配置
1
2
3
4
5
6
7
8
9
10
11
12
13
14
15
| @Component
public class CORSFilter extends OncePerRequestFilter {
@Override
protected void doFilterInternal(HttpServletRequest request, HttpServletResponse response, FilterChain filterChain) throws ServletException, IOException {
String method = request.getMethod();
response.setHeader("Access-Control-Allow-Methods", "GET,POST,PUT,DELETE,OPTIONS");
response.setHeader("Access-Control-Allow-Origin", "*");
response.setHeader("Access-Control-Allow-Headers", "*");
if (HttpMethod.OPTIONS.matches(method)) {
return;
}
filterChain.doFilter(request, response);
}
}
|
无权限访问
这段Java代码是一个实现AccessDeniedHandler接口的类。AccessDeniedHandler接口用于处理权限拒绝异常,通常在访问受保护的资源时可能会抛出这种异常。这个实现类在处理权限拒绝异常时会返回一个JSON格式的响应,其中包含错误码、消息和描述等信息。
1
2
3
4
5
6
7
8
9
10
11
12
13
14
15
16
17
18
19
20
21
| @Component
public class AccessDeniedHandlerImpl implements AccessDeniedHandler {
@Override
public void handle(HttpServletRequest request, HttpServletResponse response, AccessDeniedException accessDeniedException) {
response.setStatus(ErrorCodeEnum.OK.getCode());
response.setContentType("application/json; charset=utf-8");
response.setCharacterEncoding("UTF-8");
Map<String, Object> responseData = new HashMap<>();
responseData.put("code", ErrorCodeEnum.UNAUTHORIZED.getCode());
responseData.put("message", accessDeniedException.getMessage());
responseData.put("description", "没有权限");
responseData.put("data", null);
try {
PrintWriter writer = response.getWriter();
writer.append(JSONUtil.toJsonStr(responseData, JSONConfig.create().setIgnoreNullValue(false)));
writer.flush();
} catch (IOException e) {
response.setStatus(ErrorCodeEnum.INTERNAL_SERVER_ERROR.getCode());
}
}
}
|
UsernamePasswordAuthenticationFilter
负责拦截提交的用户名和密码,并触发认证过程。
无非就是获取用户账号密码封装成对象给 authenticationManager作为验证对象,在账号密码登录的情况下可以选择重写UsernamePasswordAuthenticationToken校验信息。但是在微信登录中不需要经过账号密码这一步,因为已经是微信登录状态了,直接保存用户验证信息在全局SecurityContextHolder中就可
当用户通过表单提交用户名和密码进行登录时,UsernamePasswordAuthenticationFilter 会拦截这个请求,并将请求中的用户名和密码提取出来,封装成一个 UsernamePasswordAuthenticationToken 对象。然后,这个 token 会被传递给 AuthenticationManager 进行认证处理。
AuthenticationManager 会调用一个或多个 AuthenticationProvider 来执行实际的认证逻辑。AuthenticationProvider 会检查 UsernamePasswordAuthenticationToken 中的用户名和密码是否与系统中的记录匹配。如果匹配成功,会返回一个完全认证的 Authentication 对象;如果匹配失败,会抛出异常。
UsernamePasswordAuthenticationFilter 还会处理认证成功和认证失败的情况。如果认证成功,它会将认证成功的 Authentication 对象保存到 SecurityContextHolder 中,并重定向用户到成功页面;如果认证失败,它会重定向用户到失败页面,或者返回一个错误响应。
1
2
3
4
5
6
7
8
9
10
11
12
13
14
15
16
17
| UsernamePasswordAuthenticationToken authenticationToken=
new UsernamePasswordAuthenticationToken(user.getUserName(),user.getPassword());
Authentication authenticate = authenticationManager.authenticate(authenticationToken);
if (Objects.isNull(authenticate)){
throw new RuntimeException("用户名或者密码错误!");
}
LoginUser loginUser = (LoginUser) authenticate.getPrincipal();
String userid = loginUser.getUser().getId().toString();
String jwt= JwtUtil.createJWT(userid);
System.out.println("jwt的值为"+jwt);
redisCache.setCacheObject("login:"+userid,loginUser);
UserInfoVo userInfoVo= BeanCopyUtils.copyOne(loginUser.getUser(),UserInfoVo.class);
BlogUserLoginVo vo=new BlogUserLoginVo(jwt,userInfoVo);
return ResponseResult.okResult(vo);
|
1
2
3
4
5
6
7
8
9
10
11
12
13
14
15
16
17
18
19
20
21
22
23
24
25
26
27
28
29
30
31
32
33
34
35
36
37
38
| public class SecurityUtils {
public static LoginUser getLoginUser() {
Authentication authentication = SecurityContextHolder.getContext().getAuthentication();
if (!(authentication instanceof AnonymousAuthenticationToken)) {
return (LoginUser)authentication.getPrincipal();
}
return null;
}
public static void setAuthentication(Authentication authentication) {
SecurityContextHolder.getContext().setAuthentication(authentication);
}
public static String encodePassword(String password) {
BCryptPasswordEncoder encoder = new BCryptPasswordEncoder();
return encoder.encode(password);
}
public static Integer getRoleId() {
LoginUser loginUser = getLoginUser();
if (loginUser != null) {
return loginUser.getUserRoleId();
}
return null;
}
public static String getUserId() {
LoginUser loginUser = getLoginUser();
if (loginUser != null) {
return loginUser.getUserId();
}
return null;
}
}
|
项目亮点
• 基于RBAC鉴权模型,结合SpringSecurity实现细粒度角色权限控制
• 使用Redis + JWT实现分布式Session,并配合拦截器实现Token自动续期
• 利用第三方CAS(中央认证服务)实现SSO,简化登录流程,提升用户体验,统一用户身份管理
• 基于CompletableFuture实现异步推送违纪通知,利用ExpiringMap管理OAuth令牌,优化缓存与会话控制
- 基于
RBAC鉴权模型,结合 SpringSecurity 实现细粒度角色权限控制
角色包括:考勤人员、学生、管理员
管理员具有后台管理考勤违纪情况的权限
考勤人员具有新增考勤记录、查找考勤详情、发送违纪消息权限
学生只有查看自己的违纪通知权限
用户登录会获取到学号/工号,利用这个可以在数据库的role表查询自己的权限,如果是考勤人员将会在loginUser中保存权限信息,并将其与令牌组成键值对保存在Redis用作会话管理,在后续访问接口时,SpringSecurity会根据配置角色权限放行拦截请求
- 使用
Redis + JWT实现分布式 Session,并配合拦截器实现Token自动续期
1
2
3
4
5
6
7
8
9
10
11
12
13
| @Override
public String createToken(LoginUser loginUser) {
String uuid = UUID.randomUUID().toString().replaceAll("-", "");
loginUser.setUUID(uuid);
redisCache.setExpireCache(RedisConstants.USER_LOGIN_KEY + uuid, loginUser, EXPIRE_TIME, TimeUnit.MINUTES);
HashMap<String, Object> playLoad = new HashMap<String, Object>() {
{
put(LOGIN_USER_KEY, uuid);
}
};
return JWTUtil.createToken(playLoad, secret.getBytes());
}
|
1
2
3
4
5
6
7
8
9
10
11
12
13
14
15
16
17
18
19
20
| @Override
public LoginUser getLoginUser(HttpServletRequest request) {
String token = request.getHeader("Authorization");
if (StrUtil.isEmpty(token) || StrUtil.isBlank(token)) {
return null;
}
String uuid = getLoginKey(token);
return redisCache.getCache(RedisConstants.USER_LOGIN_KEY + uuid);
}
@Override
public void refreshToken(LoginUser loginUser) {
String uuid = loginUser.getUUID();
redisCache.setExpireCache(RedisConstants.USER_LOGIN_KEY + uuid, loginUser, EXPIRE_TIME, TimeUnit.MINUTES);
}
private String getLoginKey(String token) {
JWT jwt = JWTUtil.parseToken(token);
return (String) jwt.getPayload(LOGIN_USER_KEY);
}
|
1
2
3
4
5
6
7
8
9
10
11
12
13
14
15
16
17
18
19
20
21
22
23
24
25
26
27
| @Component
@Slf4j
public class TokenAuthenticationFilter extends OncePerRequestFilter {
@Resource
private UserDetailsServiceImpl userDetailsService;
@Resource
private TokenService tokenService;
@Override
protected void doFilterInternal(HttpServletRequest request, HttpServletResponse response, FilterChain filterChain) throws ServletException, IOException {
LoginUser loginUser = tokenService.getLoginUser(request);
if (loginUser != null) {
log.info("登录用户: {}", loginUser);
List<GrantedAuthority> authorities = userDetailsService.getRoleList(loginUser.getUserRoleId());
UsernamePasswordAuthenticationToken authenticationToken = new UsernamePasswordAuthenticationToken(loginUser, null, authorities);
SecurityUtils.setAuthentication(authenticationToken);
tokenService.refreshToken(loginUser);
}
filterChain.doFilter(request, response);
}
}
|
- 利用第三方
CAS(中央认证服务)实现SSO,简化登录流程,提升用户体验,统一用户身份管理
1
2
3
4
5
6
7
8
9
10
11
12
13
14
15
16
17
18
19
20
| @Override
public Claims getClaimsFromToken(String token) {
String publicKey = HttpUtil.get(PUBLIC_KEY_URL);
if(publicKey==null){
throw new BusinessException(ErrorCodeEnum.BAD_REQUEST,"publicKey获取失败");
}
RSAPublicKey rsaPublicKey = str2RSAKey(publicKey);
Claims claims;
try {
claims = Jwts.parser()
.setSigningKey(rsaPublicKey)
.parseClaimsJws(token)
.getBody();
} catch (Exception e) {
throw new BusinessException(ErrorCodeEnum.BAD_REQUEST,"publicKey获取失败");
}
return claims;
}
|
1
2
3
4
5
6
7
8
9
10
11
12
13
14
15
16
17
18
19
20
21
22
23
| private RSAPublicKey str2RSAKey(String publicKey) {
String begin = "-----BEGIN PUBLIC KEY-----";
String end = "-----END PUBLIC KEY-----";
if (publicKey.startsWith(begin)) {
publicKey = publicKey.replaceAll(begin, "");
}
if (publicKey.endsWith(end)) {
publicKey = publicKey.replaceAll(end, "");
}
publicKey = publicKey.replaceAll("\n", "");
X509EncodedKeySpec x509 = new X509EncodedKeySpec(Base64.decode(publicKey));
RSAPublicKey RSAKey;
try {
KeyFactory keyFactory = KeyFactory.getInstance("RSA");
RSAKey = (RSAPublicKey) keyFactory.generatePublic(x509);
} catch (InvalidKeySpecException | NoSuchAlgorithmException e) {
throw new BusinessException(ErrorCodeEnum.BAD_REQUEST,"publicKey获取失败");
}
return RSAKey;
}
}
|
- 基于CompletableFuture实现异步推送违纪通知,利用ExpiringMap管理OAuth令牌,优化缓存与会话控制
1
2
3
4
5
6
7
8
9
10
| private static final ExpiringMap<String, String> expireToken = ExpiringMap.builder()
.maxSize(10)
.variableExpiration()
.expirationPolicy(ExpirationPolicy.CREATED)
.expiration(30, TimeUnit.MINUTES).build();
@SneakyThrows
@Async
public CompletableFuture<Boolean> sendMessage(CheckRecord record) {
}
|
1
2
3
4
5
6
7
8
9
10
11
12
13
14
15
16
17
18
19
20
21
22
23
| @Transactional
@Override
public void addCheckRecord(CheckRecord record){
CompletableFuture<Boolean> isSuccess = null;
if (record.getIsViolate() == 1&&record.getViolationId()!=null) {
isSuccess = messageUtil.sendMessage(record);
}
checkValidity(record);
record.setUserId(SecurityUtils.getUserId());
save(record);
if (isSuccess!=null){
try {
if (isSuccess.get()){
log.info("消息推送成功");
}else {
log.error("消息推送失败");
}
} catch (Exception e) {
throw new RuntimeException(e);
}
}
}
|