JUC并发编程
JUC并发编程
FANSEAJUC并发编程
本文参考链接:https://itbaima.net
- 什么是juc?
juc是java中处理线程的工具包
- wait和sleep?
sleep不释放锁睡觉,wait释放锁睡觉
- 并行和并发?
并行:
常出现在多核处理器,多个任务同一时间执行
并发:
多任务同时执行,cpu执行一个任务一段时间再切换到其他任务,实现同时进行的效果
- 用户线程和守护线程?
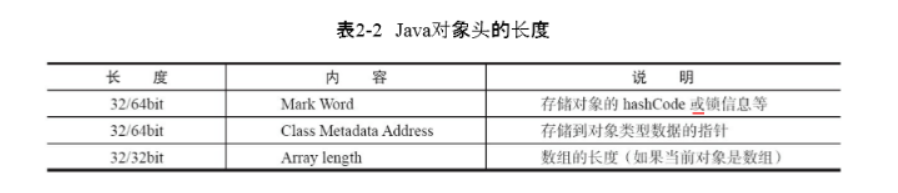
java对象头
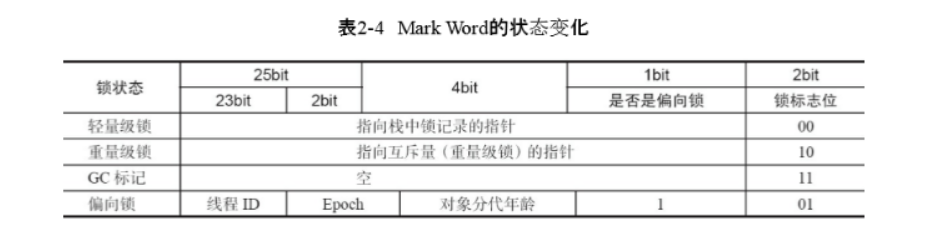
偏向锁:在很多情况下抢锁过程一般都是同一个线程抢锁成功,所以设置了偏向锁,Markword用于记录“常胜者”线程id,当参与竞争资源时,偏向锁指向的id代表的线程可以直接获取锁,无需进行CAS操作
注意:MarkWord里默认数据是存储对象的HashCode等信息,但是在运行期间,Mark Word里存储的数据会随着锁标志位的变化而变化
在表2-4中:每一个对象都有一个monitor与之关联。==重量级锁也就是通常说synchronized的对象锁,锁标识位为10,其中指针指向的是monitor对象(也称为管程或监视器锁)的起始地址==
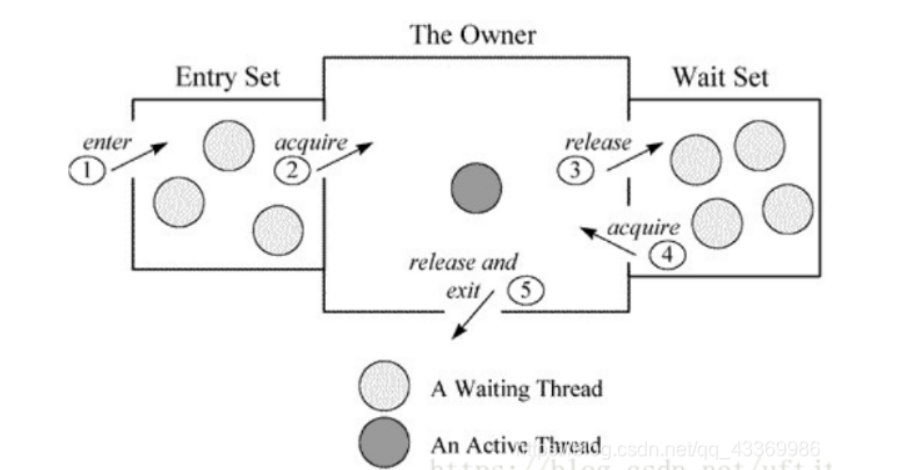
Monitor
Monitor监视器
每一个对象都有一个monitor与之关联,当且一个monitor被持有后,它将处于锁定状态。线程执行到monitorenter 指令时,将会尝试获取对象所对应的monitor的所有权,即尝试获得对象的锁。
monitor在JVM中是基于C++的实现的,ObjectMonitor中有几个关键属性:
_owner:指向持有ObjectMonitor对象的线程
_WaitSet:存放处于wait状态的线程队列
_EntryList:存放处于等待锁block状态的线程队列
_recursions:锁的重入次数
_count:用来记录该线程获取锁的次数
原文链接:https://blog.csdn.net/qq_43369986/article/details/109357146
tips:wait()方法要配合while使用,若用if唤醒时会跳过判断条件
在JDK1.4.2引入自旋锁:
为了避免每个未得到锁的线程长时间处于等待状态,引入自旋锁,它不会将处于等待状态的线程挂起,而是通过无限循环的方式,不断检测是否能够获取锁,由于单个线程占用锁的时间非常短,所以说循环次数不会太多;但是会消耗CPU性能

在JDK6之后,自旋锁得到了一次优化:
循环次数会判断此次能得到锁的概率,调整自旋次数!
自旋的次数限制不再是固定的,而是自适应变化的,比如在同一个锁对象上,自旋等待刚刚成功获得过锁,并且持有锁的线程正在运行,那么这次自旋也是有可能成功的,所以会允许自旋更多次。当然,如果某个锁经常都自旋失败,那么有可能会不再采用自旋策略,而是直接使用重量级锁。
Condition
隶属于:java.util.concurrent.locks包下
Condition:Condition 将 Object 监视器方法(wait、notify 和 notifyAll分解成截然不同的对象,以便通过将这些对象与任意 Lock 实现组合使用,为每个对象提供多个等待 set(wait-set)。其中,Lock 替代了 synchronized 方法和语句的使用,Condition 替代了 Object 监视器方法的使用。
这句话“将Object监视器方法(wait、notify和notifyAll)分解成截然不同的对象”意味着将Java中的
wait、notify和notifyAll方法从Object类中提取出来,并将它们分散到不同的对象中,而不是所有对象都继承自Object类并共享这些方法。分离出来就可以创建不同的对象响应不同情况的中断!
1 | Lock lock = new ReentrantLock(); |
| 方法摘要 | |||||
|---|---|---|---|---|---|
await |
造成当前线程在接到信号或被中断之前一直处于等待状态。 | ||||
signal |
唤醒一个等待线程。 | ||||
signalAll |
唤醒所有等待线程。 |
Lock:
1 | lock.Lock(); |
CAS算法(乐观锁)
减少锁的竞争 非阻塞性
CAS(Compare And Swap)是一种无锁算法,它并不会为对象加锁,而是在执行的时候,看看当前数据的值是不是我们预期的那样,如果是,那就正常进行替换,如果不是,那么就替换失败。比如有两个线程都需要修改变量i的值,默认为10,现在一个线程要将其修改为20,另一个要修改为30,如果他们都使用CAS算法,那么并不会加锁访问i,而是直接尝试修改i的值,但是在修改时,需要确认i是不是10,如果是,表示其他线程还没对其进行修改,如果不是,那么说明其他线程已经将其修改,此时不能完成修改任务,修改失败。
CAS自旋每次执行操作都需要判断当前状态是否为前一刻的状态,是一种无锁算法,在一些时候避免了重量级锁的线程挂起到唤醒的时间消耗!
1 | update table SET i=20 where i=10; |
锁机制
synchronized
偏向锁 -> 自旋锁 -> 重量级锁
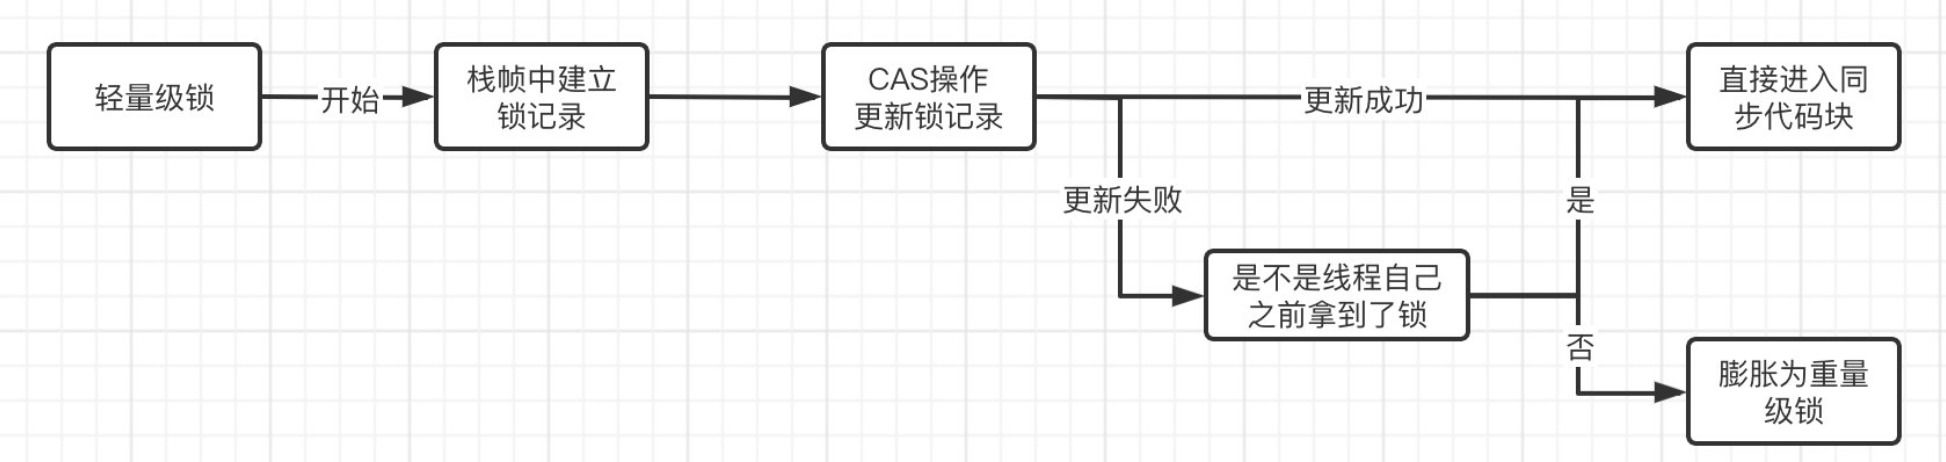
轻量级锁:偏向锁 + 自旋锁
1 | // 假设有t1和t2线程都需要执行testLock方法 |
重量级锁
synchronized最开始的锁机制通常重量级锁的挂起导致的线程切换的消费会大于程序执行时间,带来了很大的性能损耗
当一个线程获取到锁之后,其他线程会被挂起,只有当获取到锁才会被唤醒
线程的挂起/唤醒需要CPU切换上下文,此过程代价比较大,因此称此种锁为重量级锁。
轻量级锁
轻量级锁基于无锁算法CAS保障线程安全
如果一个资源竞争本来就很少,在这种读多写少的情况下就没必要每次通过重量级锁先加入等待队列再获取到锁
假设现在t1、t2是交替执行testLock()方法,此时t1、t2没必要阻塞,因为它们之间没有竞争,也就是不需要重量级锁。
线程之间交替执行临界区的情形下使用的锁称为轻量级锁。
轻量级锁相比重量级锁的优势:
1、每次加锁只需要一次CAS
2、不需要分配ObjectMonitor对象
3、线程无需挂起与唤醒
偏向锁
假设一个资源大部分时候都是同一个线程操作一个资源,这个时候每次都需要进行CAS其实也有点浪费性能
于是就出现了偏向锁,线程栈帧中会记录该锁,这就使得该线程获取锁时候只需要比较栈帧锁是否就是我需要的锁
偏向锁相比轻量级锁的优势:
同一个线程多次获取锁时,无需再次进行CAS,只需要简单比较。
可重入锁
可重入就是说某个线程已经获得某个锁,可以再次获取锁而不会出现死锁
可重入锁有:
- synchronized
- ReentrantLock
性能优于sychronized关键字
与synchronized的区别是Lock是接口,而且可以响应中断,在程序中获取锁的状态可观
公平锁与非公平锁
其实锁分为公平锁和非公平锁,默认我们创建出来的ReentrantLock是采用的非公平锁作为底层锁机制。那么什么是公平锁什么又是非公平锁呢?
- 公平锁:多个线程按照申请锁的顺序去获得锁,线程会直接进入队列去排队,永远都是队列的第一位才能得到锁。
- 非公平锁:多个线程去获取锁的时候,会直接去尝试获取,获取不到,再去进入等待队列,如果能获取到,就直接获取到锁
非公平锁就是多线程抢一把锁,能抢到就是谁的!
读写锁
读写锁维护了一个读锁和一个写锁,这两个锁的机制是不同的。
- 读锁:在没有任何线程占用写锁的情况下,同一时间可以有多个线程加读锁。(读时不能写)
- 写锁:在没有任何线程占用读锁的情况下,同一时间只能有一个线程加写锁。(写时不能读)
实现:ReentrantReadWriteLock
- 可重入锁机制
- 公平非公平锁机制
- 读写锁机制
此接口有一个实现类ReentrantReadWriteLock(实现的是ReadWriteLock接口,不是Lock接口,它本身并不是锁),注意我们操作ReentrantReadWriteLock时,不能直接上锁,而是需要获取读锁或是写锁,再进行锁操作
2
3
4
5
ReentrantReadWriteLock lock = new ReentrantReadWriteLock(true);//true表示为公平锁
lock.readLock().lock();
new Thread(lock.readLock()::lock).start();
}
锁升级
注意在仅持有读锁的情况下去申请写锁,属于”锁升级”,ReentrantReadWriteLock是不支持的:
1 | public static void main(String[] args) throws InterruptedException { |
锁降级
锁降级指的是写锁降级为读锁。当一个线程持有写锁的情况下,虽然其他线程不能加读锁,但是线程自己是可以加读锁的:
1 | public static void main(String[] args) throws InterruptedException { |
但是此时其他线程是依旧获取不到读锁的,只有当可重入锁写锁释放其他线程才能获取读锁
JMM内存模型
- 工作内存相互隔离
- 工作内存只存储成员变量静态变量,不存储局部变量
- 所有变量的操作都在工作内存执行
JMM内存模型:
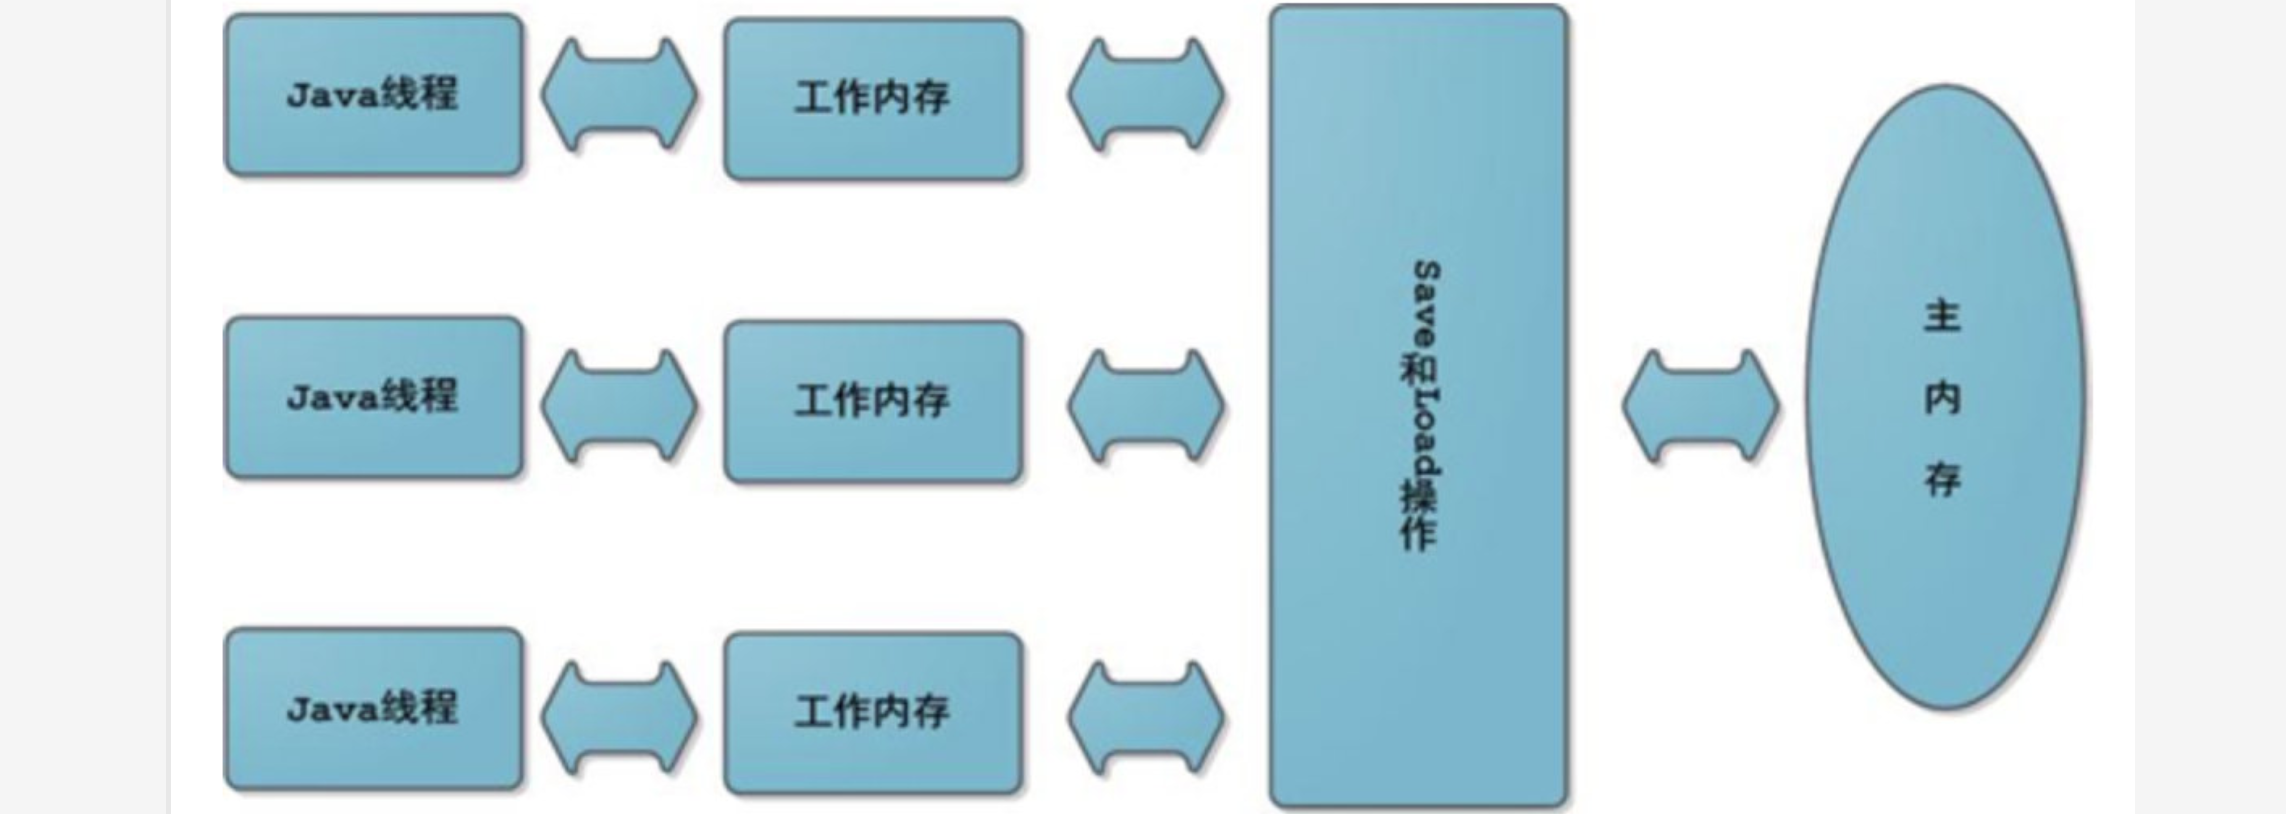
每一条线程如果要操作主内存中的数据,那么得先拷贝到自己的工作内存中,并对工作内存中数据的副本进行操作,操作完成之后,也需要从工作副本中将结果拷贝回主内存中,具体的操作就是Save(保存)和Load(加载)操作。
该内存模型会出现的线程安全问题:
1 | public class Main { |

自增操作是多条指令的组合:不能保证原子性
重排序
https://blog.csdn.net/weixin_37841366/article/details/113086438
不改变结果,也可以优化程序执行性能!(节省指令量)
但是在多线程的情况下,由于重新排序会改变程序执行先后,产生线程安全问题
1 | public class Main { |
上面这段代码,在正常情况下,按照我们的正常思维,是不可能输出A的,因为只要b等于1,那么a肯定也是1才对,因为a是在b之前完成的赋值。但是,如果进行了重排序,那么就有可能,a和b的赋值发生交换,b先被赋值为1,而恰巧这个时候,线程1开始判定b是不是1了,这时a还没来得及被赋值为1,可能线程1就已经走到打印那里去了,所以,是有可能输出A的。
volatile关键字
保障工作内存和主内存一致,但是在多线程中单靠这一操作对资源更改也不能保障线程安全,因为不能保证原子性
例:比如线程1刚刚将a的值更新为100,这时线程2可能也已经执行到更新a的值这条指令了,已经刹不住车了,所以依然会将a的值再更新为一次100。如果有原子性保障,就可以实现每次操作都是对最新值的更新
- 可以将主内存的变量同步到工作内存
- 可以防止指令重排序
- 不保证原子性
volatile会禁止指令重排,也就是说,如果我们操作的是一个volatile变量,它将不会出现重排序的情况,也就解决了我们最上面的问题。那么它是怎么解决的重排序问题呢?若用volatile修饰共享变量,在编译时,会在指令序列中插入内存屏障来禁止特定类型的处理器重排序
内存屏障(Memory Barrier)又称内存栅栏,是一个CPU指令,它的作用有两个:
- 保证特定操作的顺序
- 保证某些变量的内存可见性(volatile的内存可见性,其实就是依靠这个实现的)
1 | public class Volatile { |
happens-before
程序次序规则: 同一个线程中,按照程序的顺序,前面的操作happens-before后续的任何操作。
同一个线程内,代码的执行结果是有序的。其实就是,可能会发生指令重排,但是保证代码的执行结果一定是和按照顺序执行得到的一致,程序前面对某一个变量的修改一定对后续操作可见的,不可能会出现前面才把a修改为1,接着读a居然是修改前的结果,这也是程序运行最基本的要求。监视器锁规则: 对一个锁的解锁操作,happens-before后续对这个锁的加锁操作。
就是无论是在单线程环境还是多线程环境,对于同一个锁来说,一个线程对这个锁解锁之后,另一个线程获取了这个锁都能看到前一个线程的操作结果。比如前一个线程将变量x的值修改为了12并解锁,之后另一个线程拿到了这把锁,对之前线程的操作是可见的,可以得到x是前一个线程修改后的结果12(所以synchronized是有happens-before规则的)volatile变量规则: 对一个volatile变量的写操作happens-before后续对这个变量的读操作。
就是如果一个线程先去写一个volatile变量,紧接着另一个线程去读这个变量,那么这个写操作的结果一定对读的这个变量的线程可见。线程启动规则: 主线程A启动线程B,线程B中可以看到主线程启动B之前的操作。
在主线程A执行过程中,启动子线程B,那么线程A在启动子线程B之前对共享变量的修改结果对线程B可见。线程加入规则: 如果线程A执行操作join()线程B并成功返回,那么线程B中的任意操作happens-before线程Ajoin()操作成功返回。
传递性规则: 如果A happens-before B,B happens-before C,那么A happens-before C。
原子类
常用基本数据类,有对应的原子类封装:
AtomicInteger:原子更新intAtomicLong:原子更新longAtomicBoolean:原子更新boolean
这样可以在自增操作中保证原子性
但是他只关心预估值是否是对应的值,而不在乎是否是修改的值,所以后续引入了版本号解决这个问题
1 | public class Main { |
底层使用:volatile 关键字(保障可见性)+ CAS算法(保障原子性)
并发容器
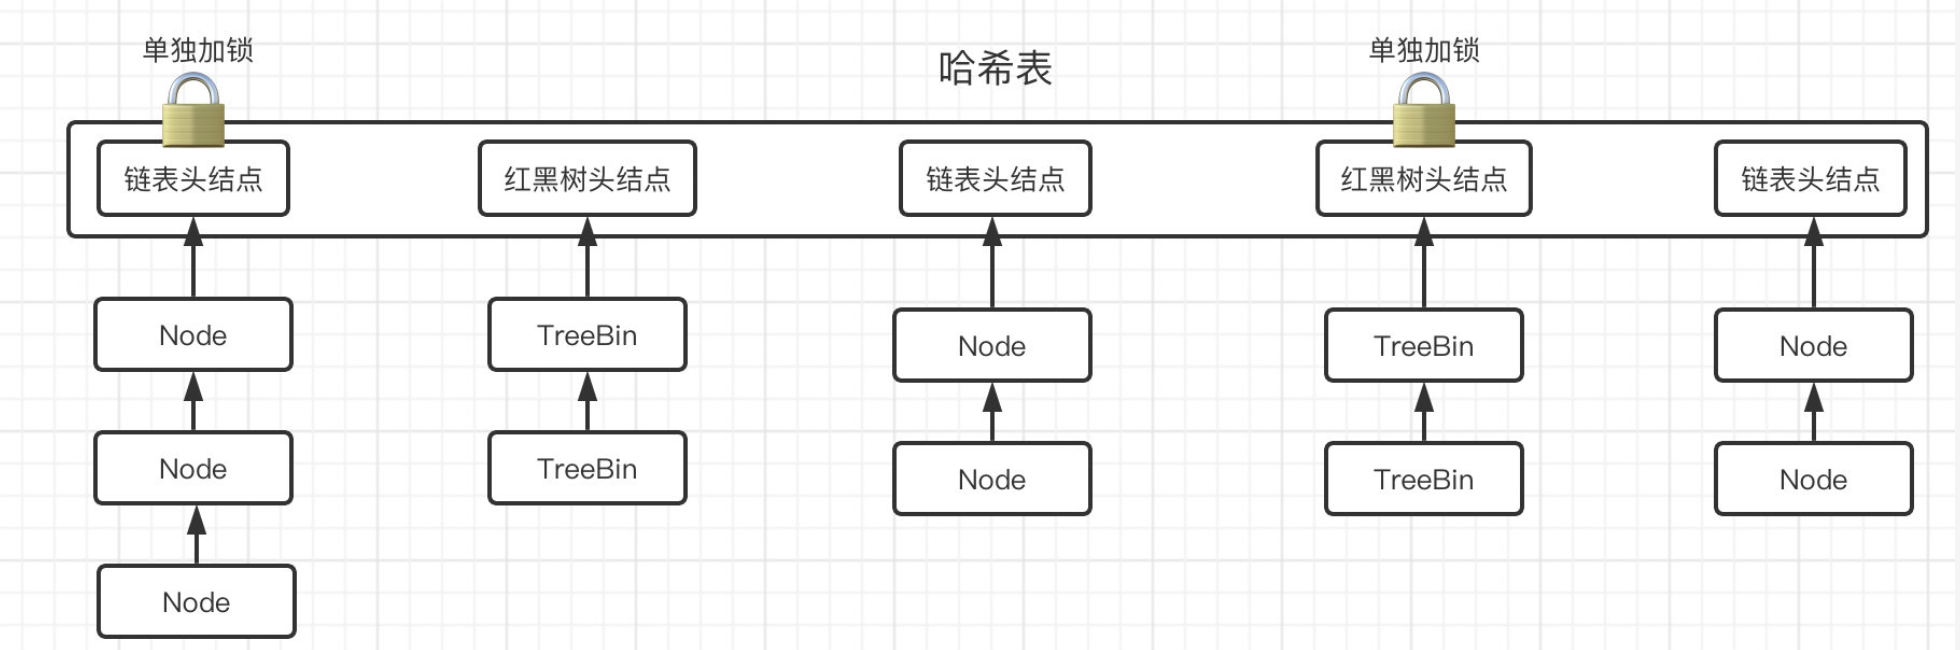
ConcurrentHashMap
1.7之前
多个bucket为一个segment,对每个segment加锁,减小锁的力度,增强并发性
1.8及以后
- 更细力度锁:减小至一个bucket、或单个节点
场景:扩容和迁移。此外,为了进一步减少锁的竞争,
ConcurrentHashMap在扩容时采用了一种称为“分步扩容”的策略,即一次只迁移一部分桶的数据,而不是一次性迁移所有数据。
- CAS算法:采用无锁算法,减少锁的使用,提高并发性能(用CPU性能换并发性能)
场景:插入新节点、更新已有节点的值
本质就是在底层运用了:CAS算法+节点加锁(双重保障)
CopyOnWriteArrayList
线程安全,继承List,基于数组实现
适用于读多写少的场景
每次对数据更改都会复制数据到新副本对新副本操作,同时修改操作保障了原子性和可见性。
当数据修改后其他线程会立即拿到最新数据,而在修改期间就是会拿到未修改之前的数据。事务隔离级别有点类似于读提交
原理:
- 读操作:不用加锁,相比
Vector读性能提高 - 写操作:COW机制,拷贝原数组到自己的副本进行修改,更改完之后再将数组指向修改完的数据(此过程需要加锁,保障同时只有一个线程能写),并且数组被
volatile关键字修饰,这样不仅阻塞读操作,而且还能及时读到最新数据
优劣:
- 优:读性能提升
- 劣:写性能下降,并且会增加空间占用
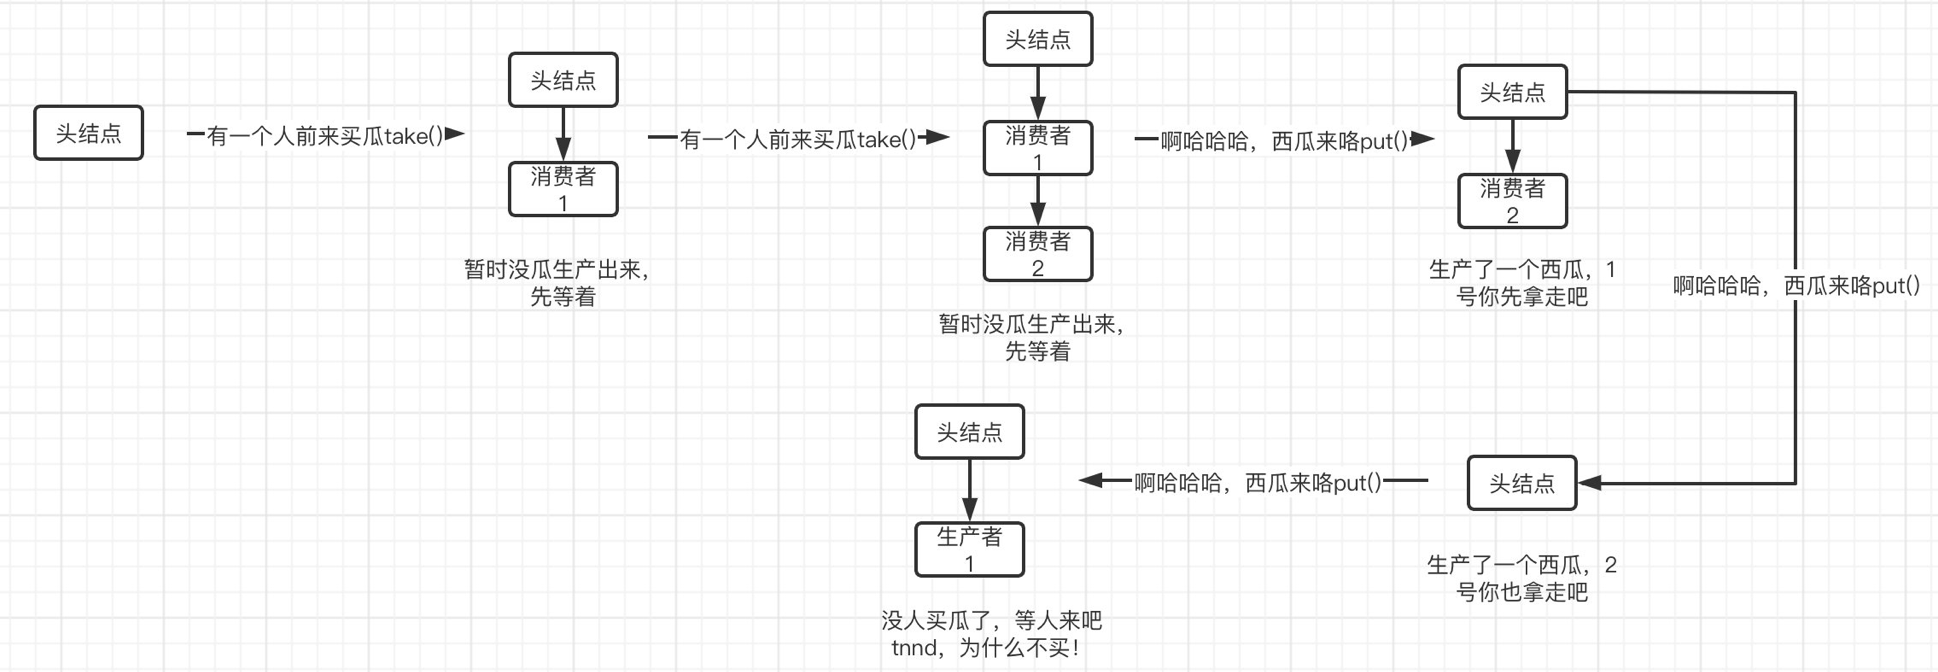
阻塞队列
先进先出
ArrayBlockingQueue:有界带缓冲阻塞队列(就是队列是有容量限制的,装满了肯定是不能再装的,只能阻塞,数组实现)SynchronousQueue:无缓冲阻塞队列(相当于没有容量的ArrayBlockingQueue,因此只有阻塞的情况)顾名思义,把队列锁住,使用该队列会导致超过最大线程数的任务直接触发拒绝规则
LinkedBlockingQueue:无界带缓冲阻塞队列(没有容量限制,也可以限制容量,也会阻塞,链表实现)
| 添加 | 移除 | 作用 |
|---|---|---|
add |
成功返回ture/失败返回异常 | |
offer |
remove |
返回ture/false |
put |
take |
阻塞 |
element |
获取头部但不移除,不存在则抛出异常 | |
peek |
获取头部但不移除,不存在则返回null | |
poll |
获取元素,不存在则返回null |
补充:
poll(activeTime, unit)可以实现结束超时等待
- ArrayBlockingQueue
1 | final ReentrantLock lock; |
- SynchronousQueue
将put,take实现杂糅到transfer方法中实现:
采用一种交接模式,同样请求的方法将会保存在链表队列中,而当出现不同请求的的时候,会将头结点与之相互抵消,因为代码中没有用到锁,效率高,但是没有容量!所以引入了LinkedTransferQueue,该Queue又有容量机制,又不用加锁
LinkedTransferQueue:
2
3
4
5
6
LinkedTransferQueue<String> queue = new LinkedTransferQueue<>();
queue.put("1"); //插入时,会先检查是否有其他线程等待获取,如果是,直接进行交接,否则插入到存储队列中
queue.put("2"); //不会像SynchronousQueue那样必须等一个匹配的才可以
queue.forEach(System.out::println); //直接打印所有的元素,这在SynchronousQueue下只能是空,因为单独的入队或出队操作都会被阻塞
}
1 | E transfer(E e, boolean timed, long nanos) { //注意这里面没加锁,肯定会多个线程之间竞争 |
接着我们来了解一些其他的队列:
- PriorityBlockingQueue - 是一个支持优先级的阻塞队列,元素的获取顺序按优先级决定。
1 | public static void main(String[] args) throws InterruptedException { |
- DelayQueue - 它能够实现延迟获取元素,同样支持优先级。
这里优先级大于延迟
1 | public class Main { |
线程的几大状态
| 线程状态 | 解释 |
|---|---|
| New | 尚未启动的线程,未执行start方法 |
| Runnable | 就绪/正在执行的线程 |
| Blocked | 阻塞状态 |
| Waiting | 等待状态的线程正在等待另一线程执行特定的操作(如notify) |
| Timed_waiting | 具有指定等待时间的等待状态 |
| Teaminated | 线程终止 |
线程池
线程池的使用
1 | ThreadPoolExecutor executor = new ThreadPoolExecutor( |
1 | public void execute(Runnable command) { |
线程池参数:
- corePoolSize:核心线程池大小,我们每向线程池提交一个多线程任务时,都会创建一个新的核心线程,无论是否存在其他空闲线程,直到到达核心线程池大小为止,之后会尝试复用线程资源。当然也可以在一开始就全部初始化好,调用prestartAllCoreThreads()即可。
- maximumPoolSize:最大线程池大小,当目前线程池中所有的线程都处于运行状态,并且等待队列已满,那么就会直接尝试继续创建新的非核心线程运行,但是不能超过最大线程池大小。
- keepAliveTime:非核心线程最大空闲时间,当一个非核心线程空闲超过一定时间,会自动销毁。
- unit:线程最大空闲时间的时间单位
- workQueue:线程等待队列,当线程池中核心线程数已满时,就会将任务暂时存到等待队列中,直到有线程资源可用为止,这里可以使用我们上一章学到的阻塞队列。
- threadFactory:线程创建工厂,我们可以干涉线程池中线程的创建过程,进行自定义。
- handler:拒绝策略,当等待队列和线程池都没有空间了,真的不能再来新的任务时,来了个新的多线程任务,那么只能拒绝了,这时就会根据当前设定的拒绝策略进行处理。
拒绝策略
- **AbortPolicy(默认)**:直接抛异常。
- CallerRunsPolicy:直接让提交任务的线程运行这个任务,比如在主线程向线程池提交了任务,那么就直接由主线程执行。
- DiscardOldestPolicy:丢弃队列中最近的一个任务,替换为当前任务。(配合SynchronousQueue使用会递归爆栈)
1 | public static class DiscardOldestPolicy implements RejectedExecutionHandler { |
- DiscardPolicy:不处理,直接丢弃掉!
当然,除了使用官方提供的4种策略之外,我们还可以使用自定义的策略:
1 | public static void main(String[] args) throws InterruptedException { |
接着我们来看线程创建工厂,我们可以自己决定如何创建新的线程:
1 | public static void main(String[] args) throws InterruptedException { |
使用newSingleThreadExecutor来创建只有一个线程的线程池:
1 | public static void main(String[] args) throws InterruptedException { |
原理如下:
1 | public static ExecutorService newSingleThreadExecutor() { |
ExecutorService
除了我们自己创建线程池之外,官方也提供了很多的线程池定义,我们可以使用Executors工具类来快速创建线程池:
- newFixedThreadPool:创建一个固定容量的线程池 + 无界的等待队列
1 | public static void main(String[] args) throws InterruptedException { |
可以看到它的内部实现为:
1 | public static ExecutorService newFixedThreadPool(int nThreads) { |
这里直接将最大线程和核心线程数量设定为一样的,并且等待时间为0,因为压根不需要,并且采用的是一个无界的LinkedBlockingQueue作为等待队列。
- newSingleThreadExecutor:来创建只有一个线程的线程池 + 无界等待队列
1 | public static void main(String[] args) throws InterruptedException { |
原理如下:
1 | public static ExecutorService newSingleThreadExecutor() { |
newSingleThreadExecutor封装了多层类,保证其不能强转为ThreadPoolExecutor,这样做可以防止ThreadPoolExecutor修改线程数方法对newSingleThreadExecutor的线程数1做修改!
所以,下面两种写法的区别在于:
1 | public static void main(String[] args) throws InterruptedException { |
前者实际上是被代理了,我们没办法直接修改前者的相关属性,显然使用前者创建只有一个线程的线程池更加专业和安全(可以防止属性被修改)一些。
- newCachedThreadPool:根据需要无限制创建新线程的线程池 + 无容量队列
1 | public static void main(String[] args) throws InterruptedException { |
我们来看看它的实现:
1 | public static ExecutorService newCachedThreadPool() { |
可以看到,核心线程数为0,那么也就是说所有的线程都是非核心线程,也就是说线程空闲时间超过1秒钟,一律销毁。但是它的最大容量是Integer.MAX_VALUE,也就是说,它可以无限制地增长下去,所以这玩意一定要慎用。
执行带返回值的任务
一个多线程任务不仅仅可以是void无返回值任务,比如我们现在需要执行一个任务,但是我们需要在任务执行之后得到一个结果,这个时候怎么办呢?
Future
这里我们就可以使用到Future了,它可以返回任务的计算结果,我们可以通过它来获取任务的结果以及任务当前是否完成:
1 | public static void main(String[] args) throws InterruptedException, ExecutionException { |
当然结果也可以一开始就定义好,然后等待Runnable执行完之后再返回:
1 | public static void main(String[] args) throws InterruptedException, ExecutionException { |
FutureTask
还可以通过传入FutureTask对象的方式:
1 | public static void main(String[] args) throws ExecutionException, InterruptedException { |
通过Future对象获取当前任务的一些状态:
1 | public static void main(String[] args) throws ExecutionException, InterruptedException { |
我们来试试看在任务执行途中取消任务:
1 | public static void main(String[] args) throws ExecutionException, InterruptedException { |
CompletableFuture
CompletableFuture 和 Future 都是 Java 中用于处理异步计算结果的接口,但它们之间存在一些关键的区别:
- 丰富的功能:
Future接口提供了基本的异步任务处理功能,允许用户检查任务是否完成(isDone)、等待任务完成并获取结果(get),以及取消任务(cancel)。但是,Future的功能相对有限,不支持任务完成后的进一步操作。CompletableFuture则提供了更为丰富的功能,包括对任务完成后的进一步操作的支持(例如,通过链式调用设置回调函数),以及更灵活的错误处理和任务组合等。
- 链式调用和组合:
CompletableFuture支持链式调用,可以在一个CompletableFuture的完成后执行另一个CompletableFuture,这样可以轻松地构建复杂的异步处理流程。Future则不支持这种链式调用,通常需要在任务完成后手动处理结果或者错误。
- 异常处理:
CompletableFuture提供了异常处理的机制,可以通过exceptionally、handle等方法来捕获和处理异步操作中发生的异常。Future没有提供内置的异常处理机制,如果异步任务抛出异常,需要在调用get方法时捕获ExecutionException来处理。
- 非阻塞性操作:
CompletableFuture提供了一些非阻塞性的操作,如join和complete,这些方法在任务完成前不会阻塞调用线程。Future的get方法是阻塞性的,如果任务尚未完成,调用线程将被阻塞直到任务完成。
执行定时任务
既然线程池怎么强大,那么线程池能不能执行定时任务呢?我们之前如果需要执行一个定时任务,那么肯定会用到Timer和TimerTask,但是它只会创建一个线程处理我们的定时任务,无法实现多线程调度,并且它无法处理异常情况一旦抛出未捕获异常那么会直接终止,显然我们需要一个更加强大的定时器。
ScheduledThreadPoolExecutor优势:
- 多线程调度
- 更好处理异常
JDK5之后,我们可以使用ScheduledThreadPoolExecutor来提交定时任务,它继承自ThreadPoolExecutor,并且所有的构造方法都必须要求最大线程池容量为Integer.MAX_VALUE,并且都是采用的DelayedWorkQueue作为等待队列。
1 | public ScheduledThreadPoolExecutor(int corePoolSize, |
传入一个Callable对象,用于接收返回值(仅执行一次):
1 | public static void main(String[] args) throws ExecutionException, InterruptedException { |
可以看到schedule方法返回了一个ScheduledFuture对象,和Future一样,它也支持返回值的获取、包括对任务的取消同时还支持获取剩余等待时间。
那么如果我们希望按照一定的频率不断执行任务呢?
1 | public static void main(String[] args) throws ExecutionException, InterruptedException { |
Executors也为我们预置了newScheduledThreadPool方法用于创建线程池:
1 | public static void main(String[] args) throws ExecutionException, InterruptedException { |
思考
java线程中start和run的区别?
start()
用 start方法来启动线程,是真正实现了多线程, 通过调用Thread类的start()方法来启动一个线程,这时此线程处于就绪(可运行)状态,并没有运行,一旦得到cpu时间片,就开始执行run()方法。但要注意的是,此时无需等待run()方法执行完毕,即可继续执行下面的代码。所以run()方法并没有实现多线程。
run()
run()方法只是类的一个普通方法而已,如果直接调用Run方法,程序中依然只有主线程这一个线程,其程序执行路径还是只有一条,还是要顺序执行,还是要等待run方法体执行完毕后才可继续执行下面的代码。
1 | public class ThreadTest { |
CompletableFuture
异步任务、任务回调、多任务组合处理
- 异步执行任务(有无返回值都可以执行)
runAsync、supplyAsync
1 | CompletableFuture<Void> hello = CompletableFuture.runAsync(() -> { |
任务回调:做完第一个任务回调第二个任务
thenRun:第一个任务可以有返回值,第二个没有返回值,前后没有参数传递thenAccept:第一个任务可以有返回值,第二个没有返回值,前后有参数传递,返回的是第一个任务的值thenApply:第一个任务可以有返回值,第二个有返回值,前后有参数传递exceptionaly:第一个任务抛出异常作为参数,传递到回调方法。异常方法可以有返回值whenComplete:第一个任务有返回值,第二个没有返回值,前后有参数传递(包括异常),返回的是第一个任务的值handle:第一个任务有返回值,第二个也有返回值,前后有参数传递(包括异常)
1
2
3
4
5
6
7
8
9
10
11
12
13
14
15
16
17
18
19
20
21
22public class FutureThenRunTest {
public static void main(String[] args) throws ExecutionException, InterruptedException {
CompletableFuture<String> orgFuture = CompletableFuture.supplyAsync(
()->{
System.out.println("先执行第一个CompletableFuture方法任务");
return "捡田螺的小男孩";
}
);
CompletableFuture thenRunFuture = orgFuture.thenRun(() -> {
System.out.println("接着执行第二个任务");
});
System.out.println(thenRunFuture.get());
}
}
//输出
先执行第一个CompletableFuture方法任务
接着执行第二个任务
null多任务组合处理,简易化任务调度
- allOf/anyOf
- and组合是当俩任务的都执行完后,拿到两个返回值处理
- or组合是当俩任务有一个完成了,拿到这个返回值处理

1 | public class allOfFutureTest { |
Java中的synchronized和ReentrantLock的区别?
Lock更加灵活
synchronized 和 ReentrantLock 都是 Java 中提供的可重入锁:
用法不同:synchronized 可用来修饰普通方法、静态方法和代码块,而 ReentrantLock 只能用在代码块上。
获取锁和释放锁方式不同:synchronized 会自动加锁和释放锁,当进入 synchronized 修饰的代码块之后会自动加锁,当离开 synchronized 的代码段之后会自动释放锁。而 ReentrantLock 需要手动加锁和释放锁;
- synchronized 获取锁的方式有:偏向锁、轻量级锁、重量级锁
- Lock 则是自旋锁,Lock还提供了非阻塞获取锁的方法:trylock获取锁的状态,通过状态不一样进行操作,避免
锁类型不同:synchronized 属于非公平锁,而 ReentrantLock 既可以是公平锁也可以是非公平锁。
响应中断不同:ReentrantLock 可以响应中断,解决死锁的问题,而 synchronized 不能响应中断。
中断:表示一个线程接收到一个特殊的信号,表明它应该停止当前的工作。
2
lock.lockInterruptibly();
- 底层实现不同:synchronized 是 JVM 层面通过监视器实现的,而 ReentrantLock 是基于 AQS 实现的
ReentrantLock怎么实现可重入?
基于线程的state,如果是同一个线程获取锁,则将state+1,否则阻塞线程;当线程需要释放锁的时候,将state-1,降到底0,则表示彻底把锁释放了,然后把线程锁指针置为null。此时唤醒其他线程,使其重新竞争锁
AQS
AQS核心思想是,如果被请求的共享资源空闲,那么就将当前请求资源的线程设置为有效的工作线程,将共享资源设置为锁定状态;如果共享资源被占用,就需要一定的阻塞等待唤醒机制来保证锁分配。
这个机制主要用的是CLH队列的变体实现的,将暂时获取不到锁的线程加入到队列中。
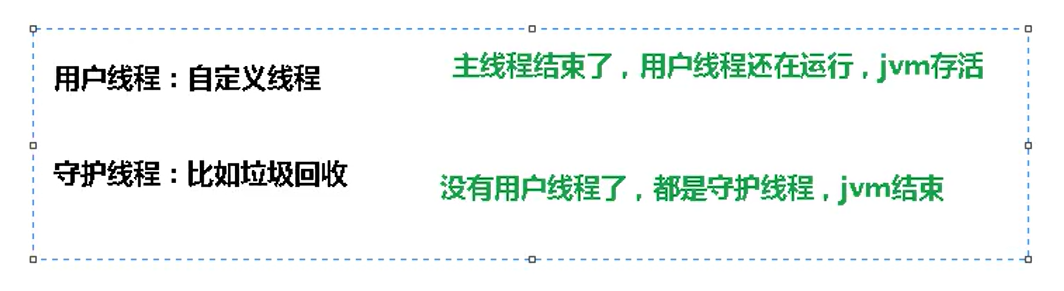
用户线程和守护线程
- 用户线程:用户线程则不依赖创建它的线程,那么当主线程结束时,子线程会继续运行;当所有的用户线程停止,JVM将会退出
- 守护线程:设计初衷是为了节省资源,通常用于执行一些后台任务,如垃圾回收、监控等。JVM退出则退出
自定义线程池
这个实现中,SimpleThreadPool 类负责管理线程和任务队列。它有一个阻塞队列 queue 用于存放待处理的任务,一个 maxCoreThreads 变量表示最大核心线程数,以及一个 handler 对象用于处理超出线程池和队列容量的任务。
execute 方法检查当前活跃的线程数是否达到了最大核心线程数,如果没有,则启动一个新的 Worker 线程来执行任务。如果已经达到了最大核心线程数,则将任务放入队列等待执行。
Worker 类继承自 Thread,它会在自己的 run 方法中不断从队列中取任务执行,直到线程池被关闭。
最后,shutdown 方法用来关闭线程池,通过中断所有正在运行的线程来停止它们的工作。为了确保所有线程都被中断,这里采用了发送中断信号的方法。
请注意,此实现仅作为一个概念上的例子,实际生产中应考虑更多的异常处理和同步机制。
1 | import java.util.concurrent.BlockingQueue; |
JUC常用类
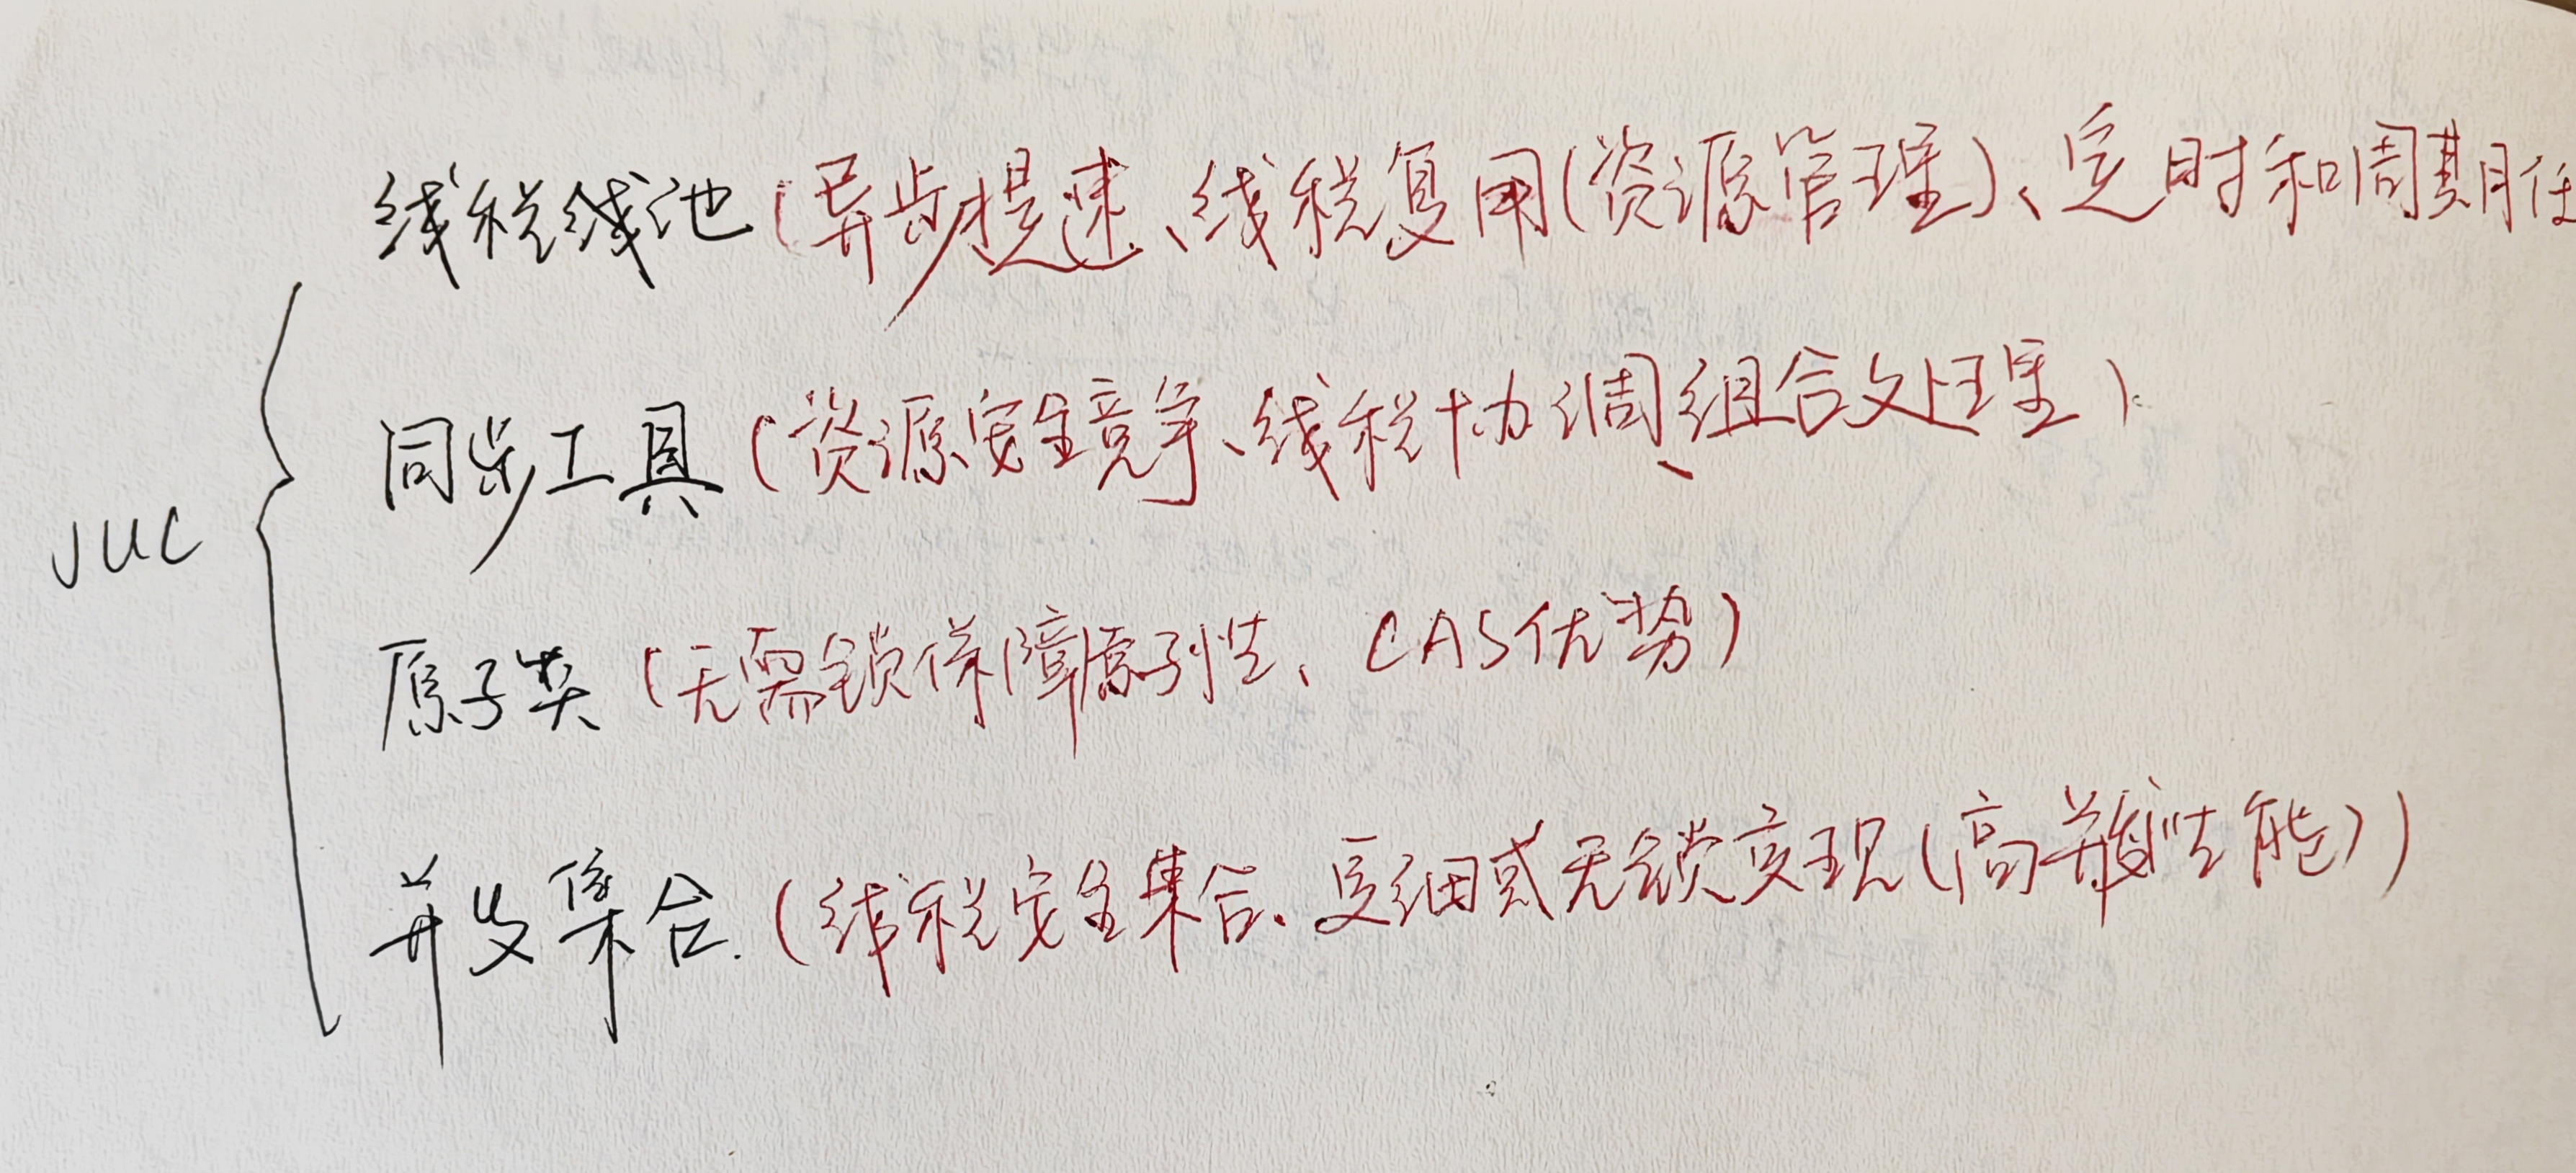
线程池:
- ExecutorService:线程池接口。
- ThreadPoolExecutor:线程池实现类。
- ScheduledExecutorService:支持定时任务的线程池。
同步工具:
- CountDownLatch:允许一个或多个线程等待其他线程完成操作。
- CyclicBarrier:允许一组线程互相等待,直到所有线程都到达屏障点。
- Semaphore:信号量,用于控制同时访问特定资源的线程数量。
- Phaser:更灵活的屏障,支持动态注册和注销参与者。
原子类:
- AtomicInteger:提供原子操作的整数类。
- AtomicLong:提供原子操作的长整数类。
- AtomicBoolean:提供原子操作的布尔类。
- AtomicReference:提供原子操作的对象引用类。
并发集合:
- ConcurrentHashMap:线程安全的哈希表。
- CopyOnWriteArrayList:线程安全的列表,写操作时复制整个数组。
- BlockingQueue:阻塞队列,支持生产者-消费者模式。
线程组合运行
聊聊线程安全
什么是线程安全?
多个线程同时访问和修改共享资源时可能出现的一系列问题:
数据竞争:覆盖写操作
死锁:两个线程互相等待对方资源释放,导致都无法继续执行
1
2
3
4
5
6
7
8
9
10
11
12
13
14
15
16
17
18
19
20
21
22
23
24
25
26
27
28
29
30
31public class DeadlockExample {
private final Object lock1 = new Object();
private final Object lock2 = new Object();
public void method1() {
synchronized (lock1) {
System.out.println("Method 1 acquired lock1");
synchronized (lock2) {
System.out.println("Method 1 acquired lock2");
}
}
}
public void method2() {
synchronized (lock2) {
System.out.println("Method 2 acquired lock2");
synchronized (lock1) {
System.out.println("Method 2 acquired lock1");
}
}
}
public static void main(String[] args) {
DeadlockExample example = new DeadlockExample();
Thread t1 = new Thread(() -> example.method1());
Thread t2 = new Thread(() -> example.method2());
t1.start();
t2.start();
}
}不可见性:一个线程对共享变量的修改对其他线程不可见
1
2
3
4
5
6
7
8
9
10
11
12
13
14
15
16
17
18
19
20
21
22
23public class VisibilityExample {
private boolean ready = false;
public void writer() {
ready = true;
}
public void reader() {
while (!ready) {
// 等待 ready 变为 true
}
System.out.println("Ready is true");
}
public static void main(String[] args) {
VisibilityExample example = new VisibilityExample();
Thread writer = new Thread(() -> example.writer(), "Writer");
Thread reader = new Thread(() -> example.reader(), "Reader");
writer.start();
reader.start();
}
}
保障线程安全的方法:
- Sychronized关键字
- 原子性(
AutoMatic) + 可见性(volatile) - 使用线程安全的集合
线程安全的集合有哪些?
基于Sychronized实现线程安全的集合:
HashTable、Vector、Collections.synchronizedList \ Collections.synchronizedMap
CopyOnWriteArrayList:写时复制,volatile保障资源可见性ConcurrentHashMap:分段加锁 +CAS算法ConcurrentLinkedQueue


